|
A
Beginners Guide to using Ahead's Nero Burning ROM.
WARNING:
This tutorial contains 16 screen captures (a total
of 361kb), be patient!
This tutorial is
intended for people who want to copy a Playstation game and don't want
to learn all the in's and outs of the process. Over the last few
years I have tried every single trick and method available to copy PSX
CD's. I have a PILE of stuffed up CD-R's that have been wasted
trying all these methods. You can save yourself all that
irritation by following my tutorial.
If you follow
these instructions perfectly, you should have a clone of your original
(or copy) shortly. Please note that this method is proven and
tested on my system, and I have written over 200 copies using this exact
method without fail. This does NOT mean it will work for you on
your equipment!
In this example,
we will make a perfectly working copy of (a copy of) Tekken 3.
(Further notes
at the bottom of this page.)
|
| What you will
need:
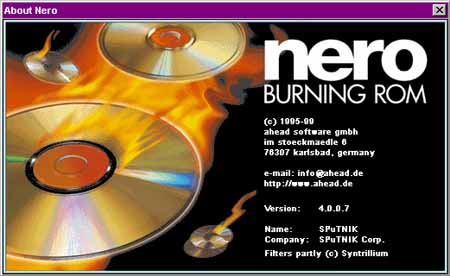
- Ahead's Nero Burning ROM software V4.0.0.7
(as used here) or later. (At the time of writing this V4.0.9.1 is
current.) [This can be found HERE.]
- A CD-Writer compatible with Nero. [You can
check if your writer is compatible here.]
(HP7200i in
this case.), and at least 650megs free of Hard Drive space.
- You will also need a Playstation that has a MOD-CHIP
installed already in order to play the copy.
- Of course you'll also need the CD you want to
copy .. :-)
|
Step 1: Download
and install the software. Make sure you register your software... :)
(You may need to visit here.)
 |
|
- Make certain the your
brand/model of CD Writer is supported by Nero. (Many are, so your
chances are good. Check here.)
- Make sure you have sufficient hard
drive space free for the image file. I would always recommend
650megs as a minimum free space requirement. |
Step 2: Choose
your destination DIR and filename.
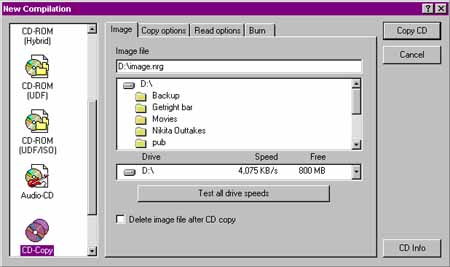 |
| - Click on "CD-Copy",
this will open the window you see above. Notice the tab's at the
top. We will go through each one induvidualliy.
-In the "IMAGE" tab, you will specify
where the image of the CD is to be stored before it is written back to
your blank CD-R. Make Certian you have enough space free!
- Note: Notice the "Delete image
file after CD Copy" should *NOT* be checked.
|
Step 3: Choosing
your copy options.
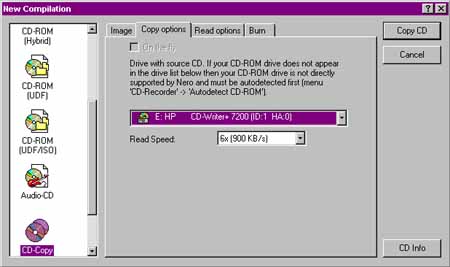 |
| - If your CD-Writer is
not selected by default, then choose it here.
- Set the read speed of the CD-Writer.
(Set this as high as you like, but if you have any crashes during the
READ phase, drop this value down to an eventual 1x speed.
- Note on READ crashes: 95% can be
rectified by removing the CD and giving it a good clean. Re-insert
the CD and restart the read process. (I am not going to try to
explain how to clean a CD, if you can't do that properly, you shouldn't
even be reading this...!)
|
Step 4: The
"Read Options" screen requires certain settings. Copy my
selections as in the picture below:
 |
| - If you are still
unable to READ from the "original" CD, se the "Number of
retries before read error:" to a higher value.
- Remeber, my settings make relieable copies for me. The
settings that are available here should be ajusted using your own
discression. This setup works 100% on my system. |
Step 5: Ready
to start? Set your final options here.
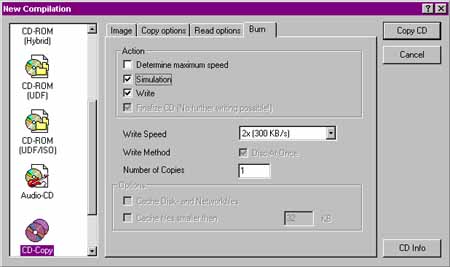 |
| - If this is the first
time you are doing this, or you have used Nero less than 10 times, I
would recommend that tick "Simulation". When you KNOW
for a fact that your current setup can make proper copies, you might
want to untick that option as it will speed up the copy process.
(Almost by half.) - I also STRONGLY
recommend using 2x as your recording speed. In my experience it is
the most reliable speed.
|
Step 6: Let
the process begin...
 |
| - Click on:
"CD Copy" and the read process will begin. Make sure you have
your source CD in the CD-Writer. Make sure you have enough free
space. (Did I menation that before? ;)
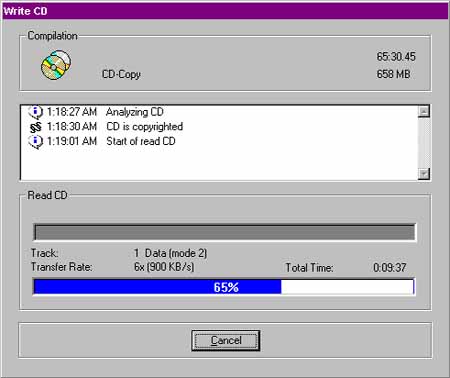
- You should see the screen above as starts to
rip an image of the CD to your hard drive.
|
Step 7 Time
for a preventative step.
|
|
|
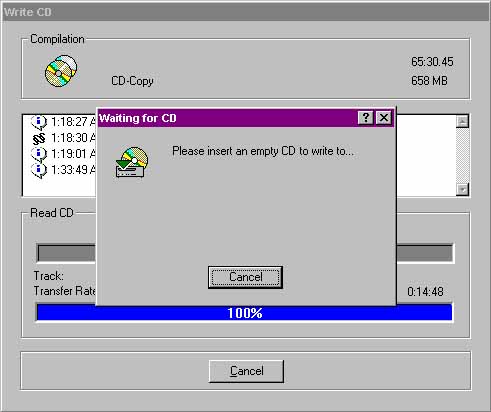
- When it's done it will ask you to
inser a blank CD. -
This is a very important step: Click on the
"CANCEL" button!
- Your image.nrg file will remain
on the hard drive! This is why we did not tick the "Delete
image file after CD Copy" option in Step 2.
|
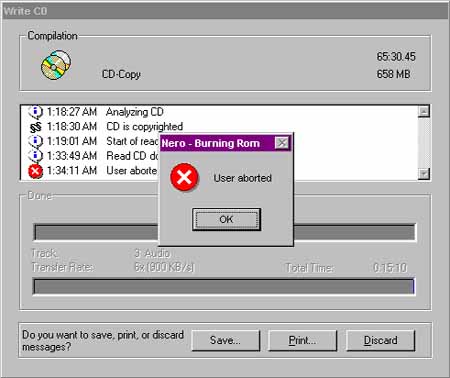
Step 8 Don't
panic! You will see the screen below once you click on
"Cancel". Don't worry about this , just click "OK".
|
|
|
- Click on "OK" and then
shut down Nero completely!
- You should now be back to
windows... |
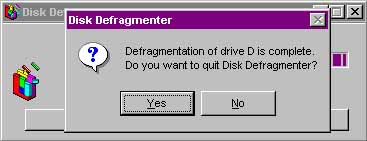
Step 9 Prevention
is better than coasters... Defreag the drive.
|
|
|
- You should now defrag the drive
that contains the image.nrg file that Nero just created. In this
case it is D: drive. - If you
don't know how to do this, you shouldn't be trying to copy CD's, you
should be learning to use windows. - Be
patient, depending on your drive size, this could take a while! |
Step 10 Relead
Nero and call up the disk image for burning...
|
|
|
- Now open Nero again. When
you are confronted with the screen that appears in Step 5, just click on
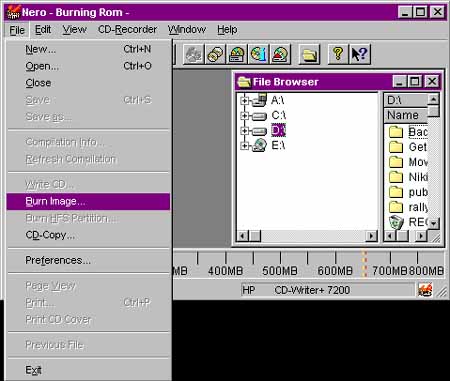
cancel. This will bring you to Nero's main screen. -
Now click on "File/ Burn Image" (See pic above..) |
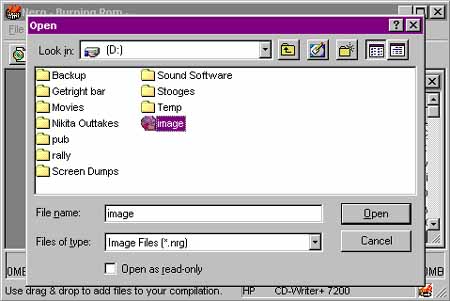
Step 11 Browse
to the disk image.
|
|
|
- Browse to the
"image.nrg" image file that Nero created earlier... (see
pic) |
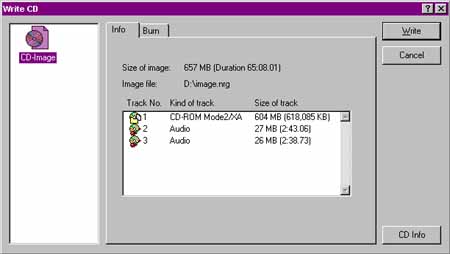
Step 12 Check
the info on the image.nrg file.
|
|
|
- On the "info" tab you
will see a summary of the details found in the "image.nrg"
file that Nero is about to write. You can use this info to simply
confirm you are burning the correct CD image. |
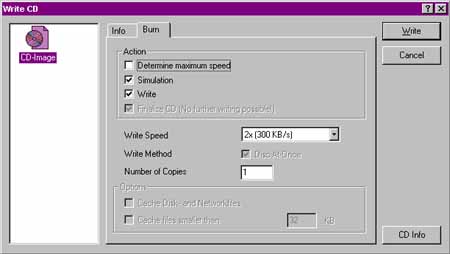
Step 13 Last
options before write.
|
|
|
- Check that all the settings here
are as they should be. - I
strongly recommend you have "Simulation" ticked if this
is the first time you are doing this. Feel free to remove it when
you are confident that your system can make relieable copies. |
Step 14 What
to write to?
|

|
|
- Click on the "Write"
button! - Nero will prompt
you for a blank CD. Give it one. |
Step 15 Let
Nero write the CD.
|

|
|
- Once you've inserted your blank
CD, Nero will begin by doing a simulation of the write process (if
ticked as in Step 13), followed by an actual write to the disk. (see pic
above) -
This is a crucial step, let Nero work in peace. Don't multitask,
play MP3's or anything in the background. This would be ASKING for
trouble. |
Step 16 Finally
complete!
|
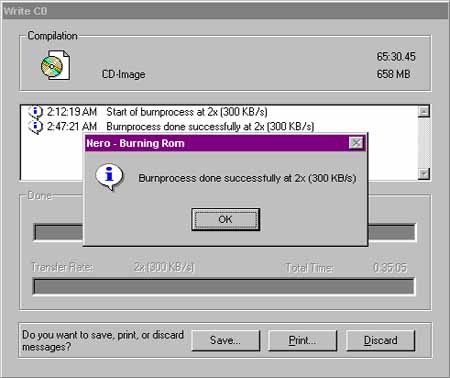
|
|
- If nothing goes wrong, you should
see the above screen! This is time for celebration as your CD is now
successfully copied and you can go and shove it in your (chipped)
Playstation. |
Some notes on Nero/PSX Copying:
- There are lots of opinions
about copying PSX CD's but the bottom line is this: PSX CD's *CAN* be
copied. Using the method described above, I have successfully copied in
excess of 200 games without a problem.
- Using this method we are basically
taking a "snapshot" of the CD, saving it to hard drive, then writing
that snapshot back to a blank CD-R disk. Forget about copying the tracks
separately and later attempting to reassemble them. That method is a load
of crap and you'll be wasting your time. (Talking from experience.)
- How PSX copy's work:
- All Playstation's are
"zoned", ie it will only play CD's from it's OWN zone. (For
example, and Japanese Playstation will not accept an American CD.)
- When you copy a PSX game, the zone
data is lost! Therefore the Playstation will not accept the disk as it
cannot determine what zone it belongs to. (Apart from the absence of the
zone code, the copy is *IDENTICAL*.)
- This is solved by installing a
MOD-Chip into the Playstation. What the chip (basically) does is
constantly "inject" the Playstation's native zoning code.
The result of this is that when you insert a CD from another zone, it's zoning
code is overridden because the MOD-Chip is constantly supplying the correct
zoning code that the Playstation is expecting.
- A side-effect of this is that if you
insert a copied game, the Playstation will accept the CD as it will THINK it's
getting the correct zoning data, as supplied by the MOD-Chip.
- So as you can see, PSX copies are
indeed simple once you understand the relationship between the (zone-code free)
copied CD and the (zone-code providing) MOD-Chip.
There are other methods of copy
protection that have been implimented to circumvent this, such as
copy-protection and MOD-detecting games etc. The MOD chip provided by me
circumvents *ALL* known anti-copy schemes, click here
for more info. If you'd like more info on these other anti-copy methods,
email me and perhaps I'll add another tutorial explaining it all.
- Games over 650meg?
- Yes, some games are more than the
standard 650megs (or less) in size. In cases like this you will need a
larger capacity CD-R disk. If you are familiar with copying CD's and the
media involved, you will know that CD-R's come in two basic sizes: 650meg/74min
or 700meg/80min (the latter being less common).
- The format that Nero uses to create
it's "image.nrg" images, often creates an image which SEEMS way too
large to be written back to any kind of CD-R media. It is common to end up
with an "image.nrg" file in EXCESS of 800megs! However, you can
write it successfully to a 650meg CD. (If Nero cannot fit it to a standard
650meg CD, it will prompt you for a larger one.)
- It is *NOT* necessary to use a 700
meg CD if you notice that your 'image.nrg" file is 699megs (or larger) in
size... Nero will fit on onto the CD,.. don't worry!
- Also note that your CD-Writer needs
to be able to support "overburn", ie it writes to a disk in excess of
650megs in size.. MOST drives these days do support this. (The
HP7200i as used in the above example DOES support it.) If your writer does
not, there's nothing you can do apart from get a better writer..
That about cover's it for now,.. if I think of anything else you need to know
I will add it later. Happy copying... :)
ENJOY! Any
questions, email me.
CopyLeft (C) 2000
SPUTNIK All righrts reserved.